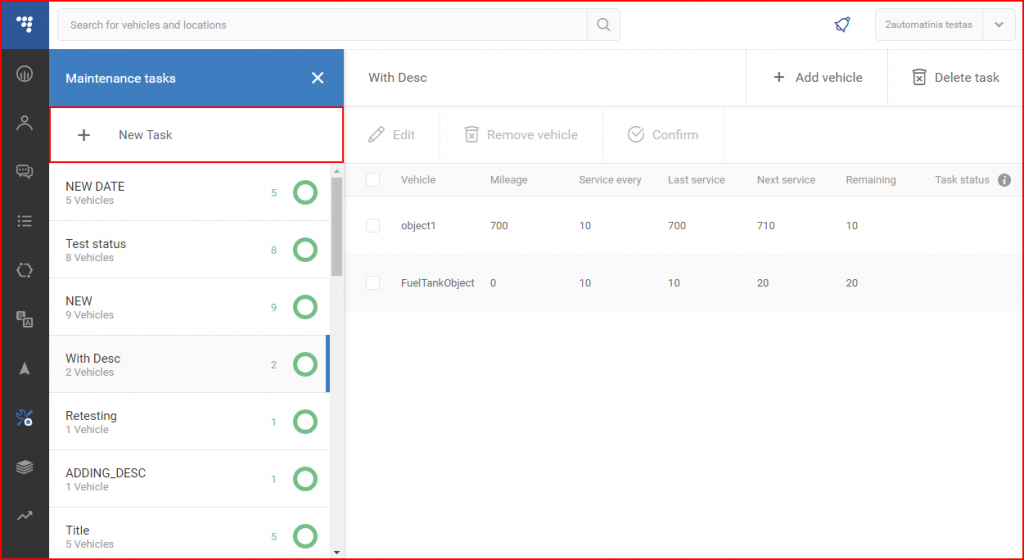
To create a new maintenance task the user must click the “+ New Task” button located at the top left side of the panel.
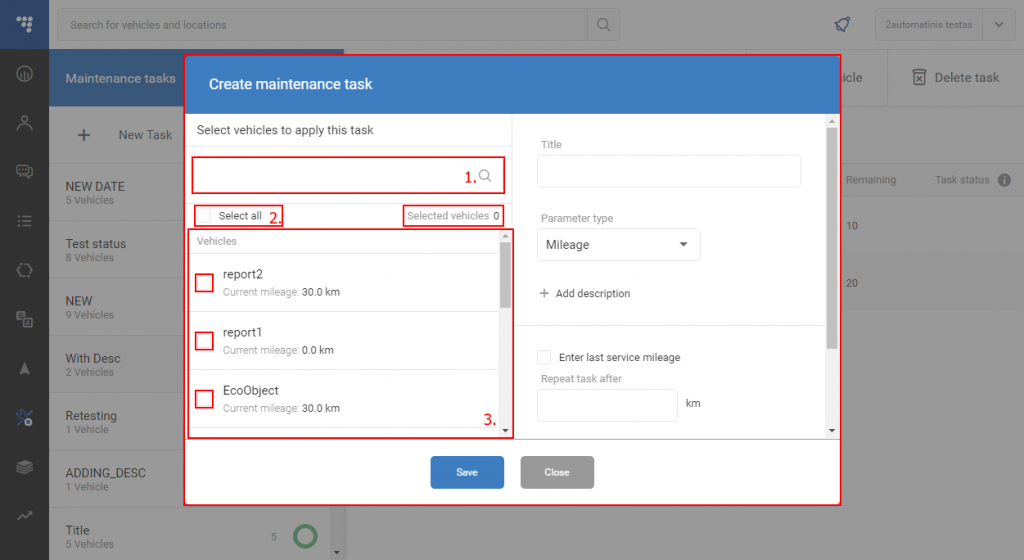
This will open a new window with setting for the new maintenance task. The first option the user must choose is the vehicle or vehicles for which this task will be valid. The user can do this using:
- The search bar to quickly search through all the vehicles in the fleet. Every letter inputted in the search bar will automatically filter through all the objects in fleet and show only the ones with matching names in the box right under the search bar.
- Select all – will select all objects currently displayed in the selection box. This means that if the search bar is used to filter through objects, and “Select all” is clicked, only the filtered objects are selected, while the hidden objects remain unchecked. (To select all objects in the fleet, the search bar must be empty!). A counter is present, located to the right of the select all button, which displays the number of currently selected vehicles.
- The selection box – by default (if search bar is empty) this selection box displays all the vehicles in the fleet in an alphabetic order, where the user can select the vehicles he desires to add to the maintenance task. To select a vehicle, the user must click the small checkbox right before the vehicles name. (A checked box will be highlighted in blue with a white tick in it).
After selecting the vehicle or vehicles for the maintenance task, the user must input the settings and a description for the task. The following information must be inputted:
- Maintenance task title/name – name of the maintenance task, this name will be displayed in the maintenance task list, and this is the main identifier for the maintenance task.
- Parameter type – defines what parameter will be used to set a period for maintenance. Clicking the small arrow will open a drop down list of all available selections:
- Mileage – this parameter is set by default and sets the maintenance period in kilometers (for example: Oil change every 7000 km).
- Date – this parameter sets the period in time, the user can input a numerical value and select a grouping for it (Days, weeks, moths, years) (For example: Oil change every 3 Months or 90 days).
- Working hours – this parameter sets the period to working hours, this parameter can only be selected for vehicles that are configured (DIN1, DIN2, DIN3 or DIN4) to send working hours data to the fleet management system (A input selector appears below the “Parameter type” where the user can select the DIN which send the data). Selecting the parameter type will automatically update the vehicle list to vehicles’ that support this parameter type, changing the input (DIN1-DIN4) will also filter the vehicle list. The period is calculated in hours. (For example: Oil change every 450 working hours).
- Add description – clicking this button will open a description text box, where the user can add a description of the maintenance task. This description is only seen when editing a vehicle settings after the task creation.
- Input – only available if parameter type is set to “Working hours”. This allows to select from which input the working time data is received, this should be selected based on the FM device configuration on each vehicle individually.
- Enter last service mileage/date/working hours – Clicking this check box will create a text field where the user can input the mileage/date/working hours of the last maintenance (the period will start counting from this mileage/date/working hours)
- Repeat task after – this allows to input the desired period (every XX Days, XXXX kilometers, XX working hours) for the maintenance based on the parameter selection (Working hours/date/mileage).
- Task confirmation – this allows the user to select one of two options for task confirmation, which will define when a new maintenance period begins. Only one of two can be selected:
- Manually confirm this task every time to start a new task cycle – this means that a new maintenance period begins only after the user confirms that the previous maintenance is complete ;
- Automatically confirm this task to start a new task cycle – This means that a new maintenance period begins right after the previous one ends without needing a confirmation from the user that the maintenance was completed;
Email notifications checkbox – enabling this checkbox will allow notifications via e-mail about upcoming maintenance tasks. More than one e-mail can be entered, by typing in a comma symbol “,” after each email. An email can be removed by clicking the small x next to the address. (Not displayed on example picture).
Alert before – this field is displayed only if the email notification check box is enabled, and it defines when to send the notification e-mails. (for example: before 500 km until maintenance is due) (the before units (km/time) depend on the selected parameter type ); (Not displayed on example picture).
- Save – This button must be clicked to create a new maintenance task;
- Close – To cancel the creation of a new maintenance task, or the user can simply click anywhere outside the settings window to close it.
After the save button is clicked, it is added to the list of all maintenance tasks.


