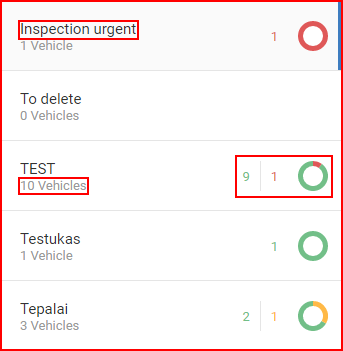
The list displays all the maintenance tasks create by the user. Every task displays additional information such as:
- Maintenance task name;
- Number of vehicles assigned to maintenance task;
- Number of vehicles by status – display a small graph and a numerical value of vehicles in each status. Three statuses exist and they are divided by colors:
- Green – Ok status, no attention needed, the time or distance till next maintenance is still longer than 20% of initial value;
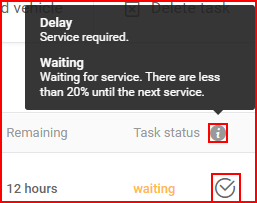
- Yellow – Waiting status, this means that a vehicle is in line for maintenance and the time or distance till next maintenance is less than 20% of initial value (Example: period is 100 days, vehicle has driven for 85 days, 15 day remain till maintenance (15% of the 100 initial day value < 20%) )
- Red – Delay status, this means that the time or distance for maintenance has fully passed and maintenance is overdue.
Clicking on a task in the list will open the overview panel for the maintenance task, by default the first maintenance task in the list is open. Overview of the overview panel:
- Maintenance task name;
- Add vehicle – allows adding vehicles to the currently selected task. The panel is similar to the previously described create maintenance task panel. Here the user can select all the vehicles he wishes to add to this maintenance task. The user can also change the description for the task and set custom values for these fields:
- Last service mileage;
- Repeat task after;
- Task confirmation.
- Delete task – Clicking this will display a confirmation window, where the user must confirm the deleting of the maintenance task. If this was clicked by accident, the user must simply click the “cancel” button or click anywhere outside the confirmation window.
- Edit – allows editing a selected vehicle or vehicles (marked checkbox), “Edit” function is described in the next section.
- Remove vehicle – clicking this button will remove all checked vehicle from the selected task
- Confirm – This button is used to confirm maintenance, clicking this button will mark maintenance for all checked vehicles. It is possible to confirm maintenance for each vehicle individually, this is described below. (NOTE: Only vehicles in yellow or red status can be confirmed! Vehicles in green status cannot be confirmed, if several vehicles of all colors are selected and confirm button is clicked , only vehicles with red or yellow status will be confirmed and a warning window will appear, that some (green) vehicles could not be confirmed).
- Vehicle list – List of all the vehicles assigned to the currently selected maintenance task. Addition information is displayed in each row for each vehicle. A checkbox is located at the beginning of each row, this checkbox is used when editing a vehicle, removing it from the maintenance task or confirming maintenance. Clicking the check box in the header will select/deselect all the vehicles in the list.
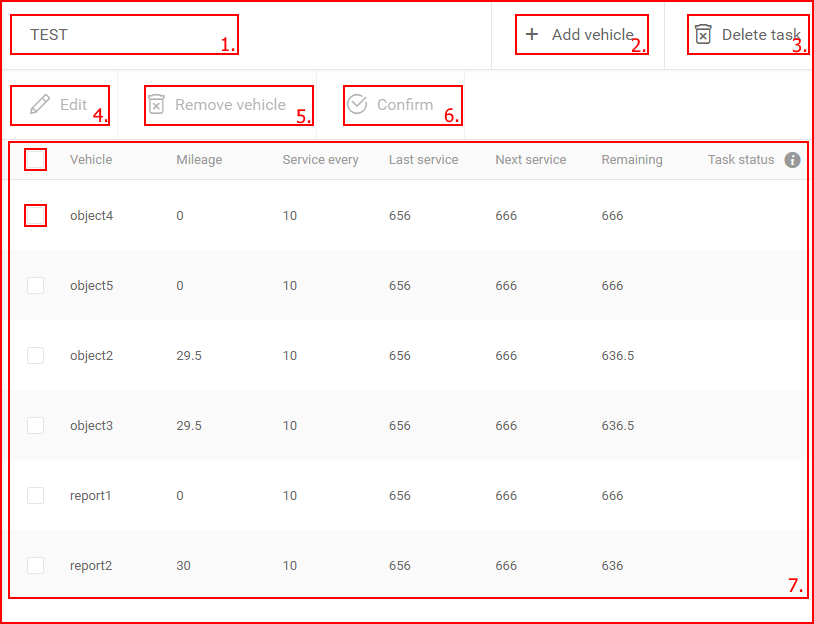
The vehicle list contains all important information concerning the set maintenance. This list can differ based on the selected parameter type. If mileage is selected, an additional column called “Mileage” will appear in the list displaying the current mileage for each vehicle, the same goes for the working hours. If working hours is selected as a parameter type, then a “Working hours” column will be present in the vehicle list. If “Date” is selected, no additional columns are present. All other columns stay identical and their headers are self-explanatory.
The last column in the list is the task status. An information icon is present next to the task status, hovering over it will display how “Delay” and “Waiting” statuses decided by the system. Every vehicle with a delay or waiting status will have a confirm button next to the current status. Clicking this button will confirm the maintenance only for the vehicle in which row the button is located.