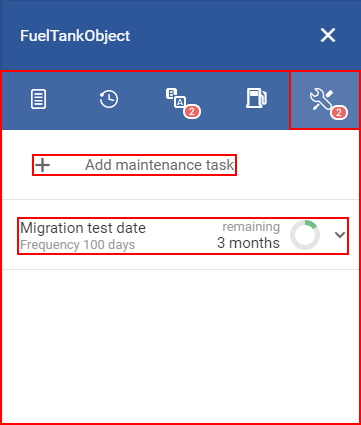
The maintenance tab allows the user to overview maintenance tasks assigned to a vehicle, assign new ones, modify old ones and mark completed maintenance tasks. After clicking the maintenance overview tab, the user will be provided with two main parts of the maintenance module:
- Add maintenance task;
- Assigned task list.
Clicking the “Add maintenance task” button will open a new window called “create maintenance task for <name_of_selected_object>”.
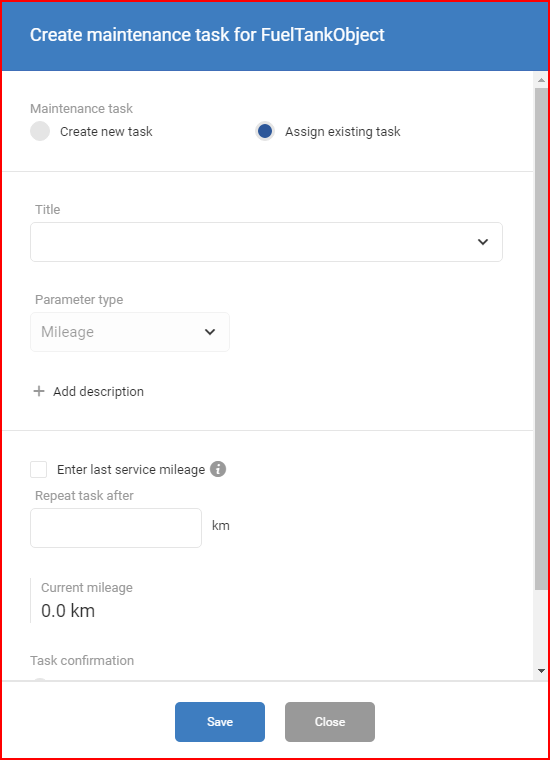
This window also allows assigning already existing maintenance tasks to the object.
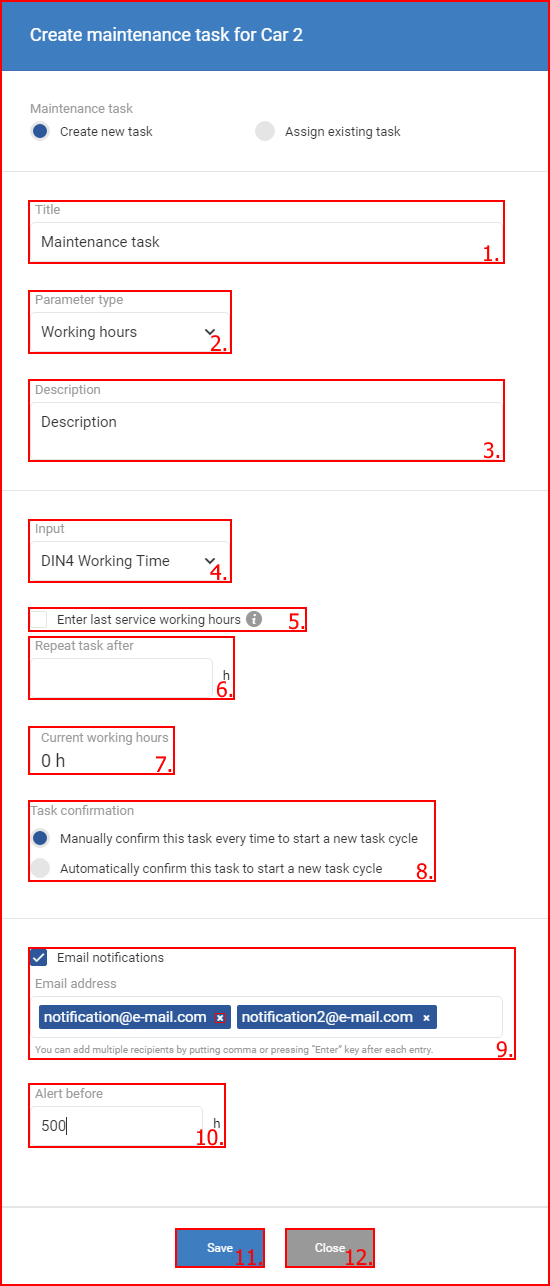
To create a new maintenance task, the user must first choose this option in the selector. The currently selected option is highlighted with a blue circle (by default the “assign existing task” is selected).

Afterwards the user can input the required information to create a new maintenance task. The following information must be inputted:
- Title – display name for the maintenance task;
- Parameter type – defines what parameter will be used to set a period for maintenance. Clicking the small arrow will open a drop down list of all available selections:
- Mileage – this parameter is set by default and sets the maintenance period in kilometers (for example: Oil change every 7000 km).
- Date – this parameter sets the period in time, the user can input a numerical value and select a grouping for it (Days, weeks, moths, years) (For example: Oil change every 3 Months or 90 days).
- Working hours – this parameter sets the period to working hours, this parameter can only be selected for vehicles that are configured (DIN1, DIN2, DIN3 or DIN4) to send working hours data to the fleet management system (A input selector appears below the “Parameter type” where the user can select the DIN which will send the data).If the vehicle is not configured to send working hour data, this parameter will not be present in the list. The period is calculated in hours. (For example: Oil change every 450 working hours).
- Add description – clicking this button will open a description text box, where the user can add a description of the maintenance task. This description can be seen when a maintenance task in the list is clicked. Also this description will be shown when editing a task.
- Input – only available if parameter type is set to “Working hours”. This allows to select from which input the working time data is received, this should be selected based on the FM device configuration on each vehicle individually.
- Enter last service mileage/date/working hours – Clicking this check box will create a text field where the user can input the mileage/date/working hours of the last maintenance (the period will start counting from this mileage/date/working hours)
- Repeat task after – this allows to input the desired period (every XX Days, XXXX kilometers, XX working hours) for the maintenance based on the parameter selection (Working hours/date/mileage).
- Current mileage/date/working hours – displays the current value of the objects parameters based on the selected input.
- Task confirmation – this allows the user to select one of two options for task confirmation, which will define when a new maintenance period begins. Only one of two can be selected:
- Manually confirm this task every time to start a new task cycle – this means that a new maintenance period begins only after the user confirms that the previous maintenance is complete ;
- Automatically confirm this task to start a new task cycle – This means that a new maintenance period begins right after the previous one ends without needing a confirmation from the user that the maintenance was completed;
- Email notifications checkbox – enabling this checkbox will allow notifications via e-mail about upcoming maintenance tasks. More than one e-mail can be entered, by typing in a comma symbol “,” after each email. An email can be removed by clicking the small x next to the address.
- Alert before – this field is displayed only if the email notification check box is enabled, and it defines when to send the notification e-mails. (for example: before 500 km until maintenance is due) (the before units (km/time) depend on the selected parameter type );
- Save – This button must be clicked to create a new maintenance task/assign existing task;
- Close – This button must be clicked to cancel the creation of a new maintenance task/task assignment, or the user can simply click anywhere outside the settings window to close it.
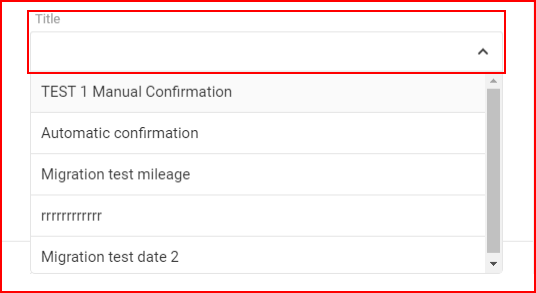
To assign an existing maintenance task, the user must first choose this option in the selector. The currently selected option is highlighted with a blue circle (by default the “assign existing task” is selected). Afterwards the process is similar to creating a new task, with an exception of several parts.
In this case the “Title” field works as a drop down list containing all existing maintenance task, the user must simply select the one he desires.
After selecting the maintenance task, the user must fill in the following fields identically to creating a new task:
- Description;
- Enter last service mileage;
- Repeat after;
- Task confirmation;
- Email notifications.
All other fields are present and not available for change.
Assigned task list – displays all tasks assigned to a vehicle. The user can click a task to show additional information on the maintenance task.
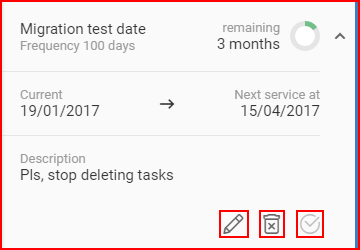
The following information is present on each task:
- Maintenance task name;
- Frequency of maintenance;
- Time/distance remaining until maintenance + Indication circle – fills up as time for maintenance comes closer, more details available in the maintenance tasks panel description.
- Current date/mileage and next service date/mileage;
At the bottom of the task, there are three buttons:
- Edit assigned task – similar to creating a new task;
- Unassign task;
- Complete maintenance – resets the maintenance period (can be clicked only when remaining period is less than 20% of initial value).
More information is available in the maintenance task panel description.